Kalogon Live Q&A Overview: Bondar Back Support
- Caitlin Hawley
- 11 minutes ago
- 10 min read
Watch the full Q&A recording here or follow along with the timestamped transcript below.
3:31 – Bondar overview & coding
So as we get going here, Bondar is our E2617 coded back rest. So whenever your wheelchair supplier and your clinician go to submit, that's going to be the code they submit it with. What that means is it's custom configured, so it's all order form based. So Bondar is going to be made by measurement and online we do have a LaunchPad which is our quote request tool. On LaunchPad, you can actually see a 3D image of Bondar as you're customizing it and going through.

4:15 – Size range & who needs Bondar
We can do anything from a 12-in Bondar up to 25 in in width or height and then the laterals we can do anything from a 3-in lateral up to an 8 in deep lateral. And you could have the height of it being the whole size of the back rest. I believe there is a minimal height and that's going to be three inches for the laterals. Anyone that would be qualifying for that E2617, that custom configured back rest where you might not need off the shelf and then you might not need to be super molded. So, we're going to be right in the middle right there, middle ground with that custom configured. Before I go on, I'll just go over some of the different things that we can do with Bondar. So we can do different things like a back rest relief where we can do an actual relief in the 3D printed shell itself.

6:05 – LaunchPad measurement & foam options
On LaunchPad you're able to select exactly where you want that relief and then you can see the visual. So the first page on LaunchPad is going to be your client measurements. They can go back, toggle, and see those measurements while they're going through the LaunchPad. You will see that 3D model, as you see right here in this picture. We offer two different foam types. We have an XLP foam, which is a little bit more uh little bit more of a high density foam, a little bit more firmer, and then we offer a 1-in polyurethane foam as well – that's going to be a more immersive foam. We do recommend that if you do order that polyurethane foam, if you have some concerns of like sweating or some odors, we do recommend the incontinence cover just because polyurethane foam does kind of hold some odor a little bit more than XLP foam. As you're going through, you can change the different height of the Bondar from 12 up to 24 in. If you put in a measurement that we can't do, the LaunchPad will actually give you a little red error message. That way, it's letting you know that the tool can't do that measurement, and that way you can go back there and put in the correct size you need.

7:18 – Mounting, customizations, & auto calculations
We do ask that you guys provide the type of wheelchair Bondar is getting mounted on because depending on manual versus power chair, it will change the, uh, adapter plate or the mounting hardware that we use for the back rest. And then for the width, if you wanted to, you can put in the width right here and kind of leave your width measurement there. Or if you want to get really custom with it, you can actually choose a custom width part where you can get more in depth and more customized there with your measurements. So right here on the LaunchPad, you can see we did an asymmetrical lateral, just showing that you could have one be at 4 in and one be at 8 in in depth. Then you can actually choose the height of the lateral and then you choose where the top lateral is to the base of the back rest to determine where you want that starting point of the lateral. Then you can choose to shape the laterals. If you need that shape to be more steep versus shallow, you can adjust that there. And you can see the model change on LaunchPad. So, if you just needed to have that one width, like at 18 in, you can leave it at that and kind of move on to the next section. Or if you were trying to accommodate and capture some more intimate shapes, you can come in here and have different width measurements. You choose where you want that curve to start on the laterals. So it'll tell you based on your lateral height where that measurement needs to be. It'll kind of guide you through as you're putting in those dimensions. One thing to note too about the width measurements and how we kind of capture width on Bondar – so if you can see right here it says the max outside width is 17.75 in and that's based on the 16 in here. So the model will actually tell you the total outer width based on your inner width measurements. So you're going to be measuring between the two inner points of laterals. You're not going to be measuring like the outer width of the back brush. It's based on the inner points of laterals. And then based on the shell and the foam you have selected, it will populate your total outer width to make sure it's going to fit in between your back canes or on the power chair you're using. So that's just a cool little feature of Bondar that it's going to do that math for you. You don't have to like sit there and do any calculations to make sure it's going to fit. You can kind of know based on your width measurements if you're going to fit in between those back canes of your uh wheelchair.
10:12 – Biangular tilt feature
This is another cool feature, our biangular tilt. So, this allows you to kind of have some curvature into that back rest where if you need to have some procline or recline, we can do 10 degrees of recline and 8 degrees of proline. So you just let us know if you want that to be rotated forwards or backwards and then toggle that bang angular feature on. It is something you don't have to add on if you don't want to.

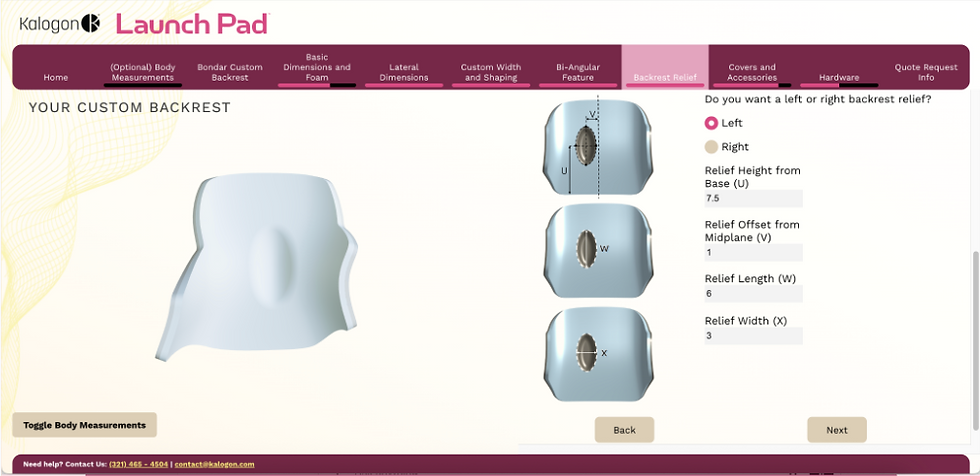
10:44 – Backrest relief feature
The next feature we have is the back rest relief. So on the relief here, you'll be able to specifically pinpoint where you want the relief in that 3D printed shell and you'll get a nice visual as you can see the little relief here. We can go in half inch increments up to a full inch in the relief. But eventually you will go through the back of that shell. So we can't get you know too much of a back rest relief there. There are some limitations and LaunchPad will actually tell you those limitations as you're going through as well.
11:17 – Foam types & functional cover features
This part here is just the construction and the foam options. So it's going to come with that outer 3D printed shell and then we have the XLP polyurethane foam. For the covers we have two different options. We have an incontinence cover and then we have a breathable cover. The breathable cover was actually designed by our seamstress who's an end user herself. She had free reigns to go and customize a back rest cover that she's always wanted. Even at some of these abilities shows, we've had people come up just trying to buy the cover itself, like where did you get this cover? So it's pretty neat. It allows you to attach different points. So right here there's actually a zipper pouch where you can open the zipper and you can add in like a water bottle you know your notebook if you happen to be using an Orbiter Med that pouch actually fits the control unit perfectly for your Orbiter Med. There are some weight bearing straps up here too. So, if you want to attach like if you have like a suitcase going through the airport, if you have another wheelchair you're having on the back, you can attach things and pull it behind. Just little things that she always wanted in her current wheelchair covers that she had the free range to go and do now. So, the breathable cover will come standard with each cushion or each Bondar. If you want that incontinence cover, you can have that selected.
12:57 – Field kit & post-fit adjustments
We do offer a Bondar field kit, which is a foam field kit, which allows you for further customizations in the field for some wedges and stuff like that to make further customizations after you get your Bondar. And then we do have a removable inner shell. This will allow you to take off the foam that you have and then you can heat form that shell for any further customizations once you get it delivered. You need to adjust those laterals more inward, flare them outward more, you can adjust that and then put that foam back on with that removable inner shell. If the removable shell isn't selected, it does make it a little bit more difficult to take the foam off because it is like Veltex on. So you to remove the Velcro to be able to heat form it and make those adjustments. So if you do plan on making some adjustments after the fact, we do recommend that inner shell. A lot of us who have a lot of experience with molded backs in the past, when you do have to alter them, the heating and the molding is easy, but there is some surgery required to get to it. With this one, we're not cutting, we're not scraping, we're just popping out two bolts, popping out that inner liner, and doing our heating and molding. That was that was something that jumped out at me as a difference on Bondar.

15:05 – Hardware & mounting compatibility
This going to be our different hardware options that we have. So, as I was mentioning early on LaunchPad, if you want to use a manual versus a power chair, these are our manual options. So, we have the quick release, we have a fixed cane clamp, and we have a dual cane clamp mount. And then we also offer a headrest mount as well. And then for power chairs, we do have a power chair adapter plate. It's going to be a universal plate. So, it'll just come one size kind of fits all with all these different attachment points for permobil quantum. We have Amy Leor attachments, Sunrise. For the most part, every power chair should be compatible with it. And if it's not, please let your territory manager know and we can get it back to the team so we can make those updates and have those different wheelchairs added on to the universal plate. We can also do a dual adapter for the adapter plate as well for the power chairs. The only time we'll use a dual hardware is if any back restrust exceeds 20 in in length or if someone is above 250 pounds we'll go with the dual hardware option.

16:17 – Ordering process & turnaround time
With ordering we do have that LaunchPad online. So as you order your Bondar you will complete the LaunchPad, submit the quote, and it will then come to the team. You will get an automated quote with your MSRP on there and then you will get your discounted quote then probably within two hours from your territory sales manager. So it's a pretty easy process in that sense where it's still order form based just like Orbiter Med and that quote will automatically get populated as you hit submit on the LaunchPad. And then once we get a PO, we're seeing between 14 and 21 business days or calendar days until Bondar is delivered.
17:25 – Easy installation process
With the install process – I know with our hardware, it's all 4 millimeter Allen wrench or Allen key, so it's all one tool for setup and adjustment. We try to make it really easy on the tech side for any installs and deliveries. Feedbackwise early on, we're hearing it's really nice with the hardware for the tech and then the ordering process for the ATPs and clinicians. Just getting that visual that way when you're in for your evaluation, you have your clinician, ATP, end user all working together, seeing that visual creating the back rest.
18:33 – Measurement workflow tips
Going through the process, it's really useful to take those client measurements first. Especially if you know what you want and you've done some stuff, but you haven't quite finished and you go home and you need to finish it up. When you take your client measurements first, they are in there and you can toggle. So later in LaunchPad and you're putting in what you want the length and the height of the laterals to be, it's nice. All you have to do is click on client measurements and on the side of the screen you'll see, oh yeah, they're ax height was 18 in. I want to be about two inches below that. that helps you sometimes choose the specifications of the back if you can be toggling back and forth and see your client measurements. So that is super useful and I love the fact that you can actually see them at the same time that you're filling out other parts of LaunchPad.
19:43 – Default vs advanced customization
The other thing I just want to highlight is not only can you customize if you want there are defaults if you don't choose some of these things so you're not forced to choose all of them but you can you can choose the steep or shallow line sort of like the trim line of the top of the lateral. So, you might want something steeper to allow more upper extremity movement like for somebody who's self-propelling. And then you can see what it looks like on LaunchPad. What's cool is that you can go back and forth and you can see the difference and one choice gives you a little bit more width in the back along the posterior surface of the torso um versus the other one.
20:44 – Advanced shaping
The last two, the custom width and shaping that you're seeing on the screen now if you're live with us, is very unique. To my knowledge, none of the other custom by measurement backs have this. And you know how when you have somebody and you have straight laterals and it's just not contacting in the lower ribs where you really would like that intimate contact, you can shape for that hourglass figure. You can put in a more narrow which is usually at the lower ribs or right around the person's waist. And you indicate what the height is from the bottom of the back rest and it will come in and shape and basically it's just giving you more intimate contact with the lateral supports. That can be asymmetrical also. You can have one lateral have a different shape on one side than the other. When I worked up a new Bondar back rest for our seamstress and we were able to do that very successfully with a slight bangular back as well.
22:01 – Inside vs outside width
The other thing I want to emphasize is the inside versus the outside width. Just to remind you because that is something that's very different than the other manufacturers in the field. Typically, you're choosing an outside width. What's nice about Bondar, I believe, is that we are asking for inside width. So, that helps you make sure it's going to actually fit the person, right? Because that is the measurement that matches the width measurements that you took on the person. And then it automatically shows you the outside width. So, just remember that these are inside widths to help you provide a better fit for the actual client's body.


